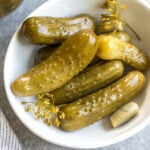
Ingredients
- 1/2 bushel of baby cucumbers (often called pickling cucumbers)
- 6 quarts apple cider vinegar
- 6 quarts water
- 3 cups Morton’s salt
- 4.5 cups white sugar
- 3 white onions, sliced
- 6 heads garlic, peeled and chopped (each clove chopped into halves)
- 2 large bunches dill weed, stems cut short so it’s mostly just the tops with about 1/2 inch of stem
Instructions
- Prepare for the canning process by sterilizing the jars and washing the baby cucumbers
- Bring 1 quart vinegar, 1 quart water, 1/2 cup salt and 3/4 cup sugar to a boil in a large stock pot
- In a fry pan, add about 1-2 cups of water and 8-10 canning lids (separated out around in the pan) over medium-high heat to ready the sealing ring
- While the brine is coming to a boil, begin filling the jars by placing 1 slice onion, 1/2 clove garlic and 3-4 stems of dill weed on the bottom of each jar
- Pack the baby cucumbers into the jar upright so they are tight and no more cucumbers can fit, then put two smaller ones horizontally on the top if they’ll fit
- Top again with 1 slice onion, 1/2 clove garlic and 3-4 stems of dill weed. Place the packed jar near to where the brine is coming to a boil
- Continue packing the jars until the brine has been at a rolling boil for 5 minutes and lids in the fry pan are hot
- Once boiling, fill a large 4 cup measuring cup with a pour spout with the brine. Fill a jar with the brine so that the liquid is covering the onion, dill and garlic on top. Remove a lid from the fry pan, wet your finger (with the brine in the jar or a separate nearby bowl of water) and trace around the rim of the glass canning jar. Place the lid on, and then screw on the metal ring as tight as you can
- Set the jar aside and repeat
- When your first brine is gone, repeat boiling process by adding another 1 quart vinegar, 1 quart water, 1/2 cup salt and 3/4 cup sugar to your stock pot. You will do this 6 times for 40 jars
- Once finished, let the cans sit where they are without moving them or messing with them
- Within an hour and through overnight, you will hear them start to “pop”, which means they have sealed completely
- The following day, you may need to reseal some if a few of them didn’t seal. To do this, run your finger over the top of each jar, and if there is no bump it has sealed
- If there is a bump, you will need open the jars that didn’t seal and pour the brine from the unsealed jars back into a stock pot to bring to a rolling boil for 5 minutes. You will need to use new sealing lids and heat those in the fry pan (repeating the process of the day before). Once they’re hot and the brine is boiling, pour the liquid back into the jars, wet the rim of the jar and place a new lid onto the top. Place the metal ring on and tighten as much as you can. Set them aside and wait for them to “pop” to ensure they have sealed
- Once all of your jars are sealed, move them to a cool location like a pantry or storage room and let them sit for 6 weeks before opening and eating
- Enjoy throughout the year!
Notes
Supplies needed:
Whichever way you sterilize your jars, you want to do this relatively close to the time you fill them to avoid the glass breaking, which can happen sometimes when a glass container is cold and you pour boiling liquid into it. If you want to sterilize the day or night prior to doing the actual canning, before you start canning, simply fill your (clean) sink with hot water, place jars into it and let them sit for at least 10 minute before you start filling the jars with cucumbers. When you’re filling the jars, just take each one from the hot water bath. Once the sink is empty and you’ve filled those jars with cucumbers, just place the next batch into the sink to warm.
Find it online: https://www.wholekitchensink.com/homemade-dill-pickles/
